Are You Learning Or Just Copying?

Spending as much time as I do – enjoyable time, to be sure – transcribing and playing along with the solos by my musical idols of the moment, I sometimes have to stop and question whether I am making the best use of the (unfortunately) limited time I have for practicing.

To begin with, there is always the question of whether I should be writing instead of learning. The answer to that may well be “yes”, but I don’t seem to be in a writing mood these days – being a software developer and editor of Woodsheddin’ rarely leaves me with enough concentration for writing. But learning solos and licks is something I can do whenever I have a spare hour.

OK, but what do you do with those licks? Well, to be sure, I use them literally in performance as I play “Night and Day” a la Django or “Road Song” a la Wes. And you get several pure benefits just from doing the work of transcribing and practicing up to speed. The act of transcription extends your musical vocabulary. I often come away with a sense of “I didn’t know you could get away with that” after transcribing some killer-sounding passage that completely violates whatever harmonic logic I’ve absorbed through the years. It’s a liberating feeling, like being given permission to go beyond the world of formal rules about what’s right and wrong, and to play in the world of pure imagination. Even if emulating someone playing from that place doesn’t get you there, it reminds you that the place and the feeling exist.

Emulation is also great for your chops. Getting your fingers to move in patterns that are unfamiliar, often at challenging speeds, expands your physical capabilities and breaks you out of ruts. If your muscles evolve to where they are comfortable moving like Wes Montgomery (or Art Tatum or John Coltrane or Jimi Hendrix), then your spontaneous improvising is likely to drift in those directions on occasion. A gradual process of integrating new sounds and new approaches with your own playing style is bound to occur if you just play the new riffs enough and naturally listen more carefully to everything as you get deeper into one thing. 

This article is about what we can do to consciously accelerate that kind of integration.

Mainly the process involves actually thinking about what I’m doing and, in a practice situation, extracting the essence of a riff (i.e., answering the question, “just what is it about this passage that appeals to me so much?”), and applying it in a new context. Well, gosh, this is suspiciously like work. And, in fact, it is work, but the rewards are substantial and lasting.Let’s look at two examples for now: two little fragments of riffs, one from Wes and one from Django (also used by violinist Stephane Grappelli).

Interestingly enough, both of the examples that I am drawn to look at are essentially ornaments – ways of hitting a particular note that involve “beating around the bush” a little bit by trilling or slurring the adjoining notes before settling into the target. As all classical players know, ornaments are key elements of various musical styles. The way you play the ornament around a single note can determine whether you’re playing in a Renaissance, Baroque or Classical style – or, in our case, whether you sound like a bluesman or a gypsy.

Look at the first ornament, taken from the first turnaround of Wes’ Montgomery’s solo on Road Song, from the CD Jimmy & Wes, The Dynamic Duo (click here for more about the CD and the solo), shown here (the song is in Gm):
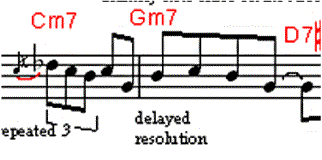
I was drawn to thinking about this element simply because it feels so good to play. If you’re playing in a jazz context, throwing this riff in just says “blues”. So, the question is, where does it work best? When should you use it?

Being the brute-force kind of experimenter guy that I am, I figured the best way to approach this would be to put a major and minor blues progression onto tape (well, actually I used an Echoplex looper, but that’s just ’cause it was convenient), to play phrases involving the ornament on top of it, and to see what works. And I made it even simpler for myself: I just played the first five notes (together with the grace note at the start). The phrase eventually, as I tried to apply it, got even shorter, until I was using just the first three notes (plus the grace note).

What I learned is simple: this sounds great practically in any part of a blues progression, major or minor, as long as you start on the fourth degree of the scale. So, in a Gm progression, start the trill on a C. In E, start in on A.

Oh yeah, there’s one other thing to keep in mind – although it’s great, during practice, to play the ornament a zillion times, wherever it fits (or even where it doesn’t fit), you should use it far more sparingly when actually performing. If you sneak it in a few times (or even just once!) in an evening, it can add a bit of spice without becoming a cliche.

By the way, another key stylistic element of Wes’ playing that I discovered while transcribing and analyzing is the fact that he almost always uses a half-note interval when sliding into an octave from below – almost never a whole step or other interval. And he does quite a bit of this sliding.

In the next issue of Woodsheddin’: we’ll apply this method to the “gypsy trill” beloved of Django Reinhardt and Stephane Grappelli.

Digital Recorder full but no files shown – for Mac users

This is just a little tip for other musicians who, like me, have purchased a digital recorder and received a “Memory Card Full” message despite having deleted all the files. If you are in this situation, I have one question for you: Did you delete the music files from your computer using a USB connection to a Mac? That turned out to be the problem in my case.

Let me explain.

Last fall, I purchased a Tascam DR-05 recorder, because I was unhappy with my phone’s mono recordings (there are a number of similar recorders from Tascam, Zoom and other companies – this post applies to *all* of them). The DR-05 is pretty small, inexpensive, easy-to-use (once you’ve figured out a few small things) and makes great recordings – infinitely superior to my phone. I use it to record jam sessions so I can listen to myself after the fact and gain a better understanding of what worked and what didn’t.

It’s been pretty easy to get the large music files from the recorder to my computer: just use the provided USB cable, and the recorder looks like an external disk drive to my computer. Then, I pull the files over to my computer using the Mac Finder, and delete the files from the recorder (also using my computer to do this). Usually, I end up opening these files in SlowGold, where I can quickly find and listen to my own solos, and easily label the interesting (good or bad) places by placing Loop Points there.

I have been doing this for a few months, and then suddenly yesterday I got a “Memory card full” message, which was perplexing. I only had one file visible, and it was fairly small. When I attached the DR-05 to my Mac, I saw the one small file, but I also noticed the .Trashes folder, a hidden folder which I happened to see because I’m a developer and I have my Finder configured to show me hidden folders.

When I looked into my hidden .Trashes folder, I discovered every recording I had ever made saved in the folder!

No wonder there was no room left on the card! Even though I had chosen “Move to Trash” for all these files, I hadn’t really been checking what was going on. OSX had literally been moving the files to a special system folder called Trash rather than deleting them.

You can clear these files from your digital recorder using the Mac’s “Empty Trash” command, but that will also empty any trashes on your computer (which is usually fine). If you just want to delete the trash files on the recorder without emptying your computer trash, you can go into Terminal and type in “rm -r /Volumes/<diskName>/.Trashes/”, where <diskName> is replaced by whatever name is shown in your finder for your digital recorder’s files (a note of caution: don’t fool around with the rm -r command if you don’t know anything about command line unix. You can accidentally delete thousands of files irretrievably. Whoops!)

I hope this clears up the mystery of the disappearing memory card space!


Gypsy Jazz Ornaments

In an earlier article, “Are You Learning Or Just Copying”, I advanced the idea that ornaments are essential elements of any style, and that copying ornaments from records and applying them to new situations is a great way of evoking the feel of a style.

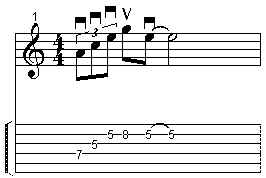
This observation applies especially to jazz in the style of Django Reinhardt, who utilized ornaments called “enclosures” extensively. In a previous article, we analyzed and reapplied a Wes Montgomery ornament. In this article, we’ll give the same treatment to what I call a variant or two as encountered on recordings. (Turn: An ornament consisting of four or five notes that move up and down ‘around’ a given pitch, using that pitch as a tonal center. It is often referred to as an enclosure.). The first turn is a grace note triplet preceding a “target note” (C, in the following example), like in the first measure of this example:

The second measure shows how the turn is more typically extended and resolved (by continuing the chromatic motion for one more step up, and then continuing with whatever the melody needs to do); so the actual turn is really 5 notes: 3 grace notes and 2 eighth notes.

In practice, Grappelli tends to really play the first triplet as grace notes, while Reinhardt is more likely to steal more time from the preceding note.

For instance, in the version of “Nuages” on Django Reinhardt: Verve Jazz Masters 38, Grappelli plays the third and fourth phrases like this:

In this case, the A in the third measure is preceded by three grace notes (not shown): Bb – B – Bb.

Here’s another example of the trill, from the beginning of Night and Day’s head, from the same CD. This time Django is playing:

In this case, the three grace notes have been expanded to take up a full beat (I’m exaggerating, and the true timing is somewhere between these two extremes). But the form remains the same: it’s a turn leading to the G on the fourth beat of the second measure, and then the chromaticism is extended, as the turn continues down to the Gb and back up to the G in the last measure.

Either way, the chromaticism in the turn, totally contemptuous of the key signature, is a large part of what gives it “gypsy” flavor. A more classical turn might keep the same kind of rhythm and shape, but would more likely use notes within the key signature.

So how do you integrate this into your playing?

First of all, a great type of chord progression to use this on would be a gypsy-type version of that old standard, “Bei Mir Bist Du Schein”. This song is, in it’s simplest form, a 3-chord song consisting of just Am, Dm and E7. However, we’ll jazz it up by substituting a progression involving m6 chords for the Am, and adding an F7 at the end of the form just to spruce up the turnaround. Here’s how the chords go in the A section:

| Am6 Bm6 | C6 Bm6 | Am6 Bm6 | C6 Bm6 |

| E7 | E7 | Am |  F7 E7 |

Try improvising over that, starting each phrase with the turn starting on various notes. Which starting notes work the best? (my favorites are E, A and C in that order – the notes of the root chord, even when the other chords are sounding). See what you can come up with! And then try integrating the turn into the middle  of phrases – that’s when the chromaticism really comes alive.

Learning From Scott LaFaro

Our Fragile Egos

Q: How many guitarists does it take to change a lightbulb?

A: 50 – 1 to change the bulb, and 49 to stand around and say, “I can do that”.

A subscriber to Woodsheddin’ recently wrote to me and expressed how he was so awed by some of the guitarists that he admired that it was depressing to him, causing him to despair of ever achieving great heights. It was easy for me to identify with this feeling, because I’ve felt that way myself – more frequently than I care to admit. I think we’ve all been there at one time or another.

I responded that there are few truths that help you understand and accept your place in the musical “pecking order”, such as it is, as follows:

  1. There are always quite a few people who are a lot better than you in some really impressive manner. There are a lot of other people out there. Even when just a small percentage are obviously gifted with immense talent, that adds up to quite a few people. In other words, you can be truly fantastic and still not be in the top 100 talented people or groups – even in a niche genre!
  2. Even if your talent and skills aren’t the scary, mind-boggling type (yet) – as in Jimi Hendrix, Celine Dion, Art Tatum, etc. – your creations can still have artistic value. What does that mean? To me it means that sometimes people really enjoy what I play or sing. Sometimes it just means that I enjoy what I make, although I have to say that appreciation in isolation can feel empty.
    And you might be more unique than you think. Sometimes there are a few tricks you know that most people don’t. In any case, you can always “be you” better than anybody else can (yes, of course it’s a cliché, but that doesn’t make it wrong). Discovering just what this means might be a lifelong search. It might be more about personality, or songwriting, than about technical instrumental wizardry per se. And the world may or may not appear to be vitally interested in the theater of “you”, but you should be.
  3. Commercial success in music isn’t strongly correlated with talent and skill. A considerable level of talent and skill are usually prerequisites for success, but once you’re past the basics, many other factors help determine the outcome: ambition, appearance, resources, contacts, background, age and being in the right place at the right time. For instance (warning: cynicism alert!), if you’re a gorgeous (male or female) singer with incredible pipes, living in LA and aged 17-25, your chances for superstardom might be decent. The rest of us would do well to be happy with other dreams.
  4. Just because you’re not famous, it doesn’t mean you’re not good. Popular music tastes are fashions. Your own tastes are your own tastes, regardless of fashion. Sometimes the two things coincide, you’re in the right place at the right time, and your skills are at the right level to benefit. Then, it’s BINGO. Many of us (such as myself) have tastes that are unlikely ever to coincide with the popular imagination. We just have to appreciate and live with that fact.
  5. Even if you’re not good – or you don’t think you’re good – you can still enjoy the learning process and playing with other people. The satisfaction that you derive from the process of getting together and making music with others can be immense at any level of accomplishment.
  6. When you start out, you can’t expect to be very good. As you play more, you get better. You almost can’t avoid it, as long as you keep playing.
  7. You set your own values. I don’t play to filled arenas, or even large concert halls. But I do play out. And for me, if at least some people can derive a unique kind of joy from my playing – and they do, at least on occasion – that is sufficient.

Mind-Bending Upstroke Exercises

If you’re like me, you’ve never paid that much attention to upstrokes. Like many flatpick-wielding guitarists, I’ve concentrated on alternating picking technique for most of my playing life. And that makes sense – it is certainly the most versatile, general purpose technique that there is. You also probably have a smattering of downstroke-based ascending arpeggios in your repertoire (see example 1). If this is all you’ve done, you’ve ignored perhaps 30% of your picking potential. These exercises will start you on the road towards harnessing that potential.

Example 1:

wpe1.jpg (8878 bytes)

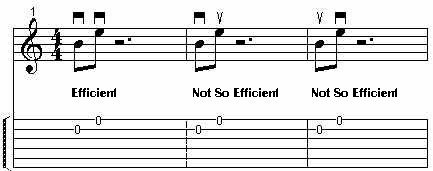
What I’ve found, though, as I’ve delved into the guitar techniques of Django Reinhardt and Jim Hall, are systematic exploitations of the technique known as “sweep picking.” This refers to the technique of eliminating the inefficiencies that alternating picking imposes on you when you change strings. The simplest case: if you were to play two notes in succession on adjacent strings, sweep picking would dictate that you sound both notes with the same direction stroke, while alternate picking would make you move that pick a lot more  (example 2).

Example 2:

wpe2.jpg (12874 bytes)

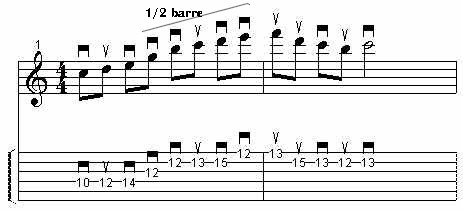
Sweep picking is not universally applicable – there are many riffs which don’t lend themselves to this technique – but there are some passages that are virtually impossible to play at full speed without it. The basic principle of sweep picking is to put an odd number of notes on each string – typically 1 or 3, as in example 3. Note that having an even (2) number of notes on the top string facilitates the change of pick direction.

Example 3:

wpe3.jpg (16608 bytes)

In order to fully integrate sweep picking into your playing, your upstrokes must become as powerful, controlled and fluid as your downstrokes. Example 4 will go a long way towards making that happen if you are sure to accent the first note of each triplet and play the other two softly, regardless of where the up and down strokes fall.

Example 4 is

  • the key to basic phrasing flexibility
  • much longer than it looks (you need to repeat the pattern about 6 times before the cycle is complete)
  • both devilishly complicated and quite simple
  • not a finger-twister at all, but quite a mind-twister

(Okay, look – maybe it’s easy for you. Then you’re beyond this column. It wasn’t easy for me at first.)

Let’s explain it before playing it. On the surface, the structure is simple: you start out by playing 3 adjacent notes on the 5th string, then move the same pattern up to the 4th, then up to the 3rd, then to the 2nd, “sweeping” the transition from each string to the next with successive downstrokes. You continue this pattern to the 1st string, but only play two notes in order to facilitate a change of direction from ascending to descending. At this point, we start sweeping with upstrokes bridging adjacent strings instead of downstroke. At this point, the accents start to diverge from the note crossings, and you have to mentally track both, emphasizing the first note of each beat (which, in this measure, happens to fall on a downstroke) while being careful to cross strings with un-emphasized upstrokes. This pattern continues down to the 6th string, where two notes are played and the direction reverses again. The G# in measure 3 is usually where I lose it if I’m not paying enough attention – maintaining the correct accents throughout that second ascent, where all the accents occur on upstrokes, can be a challenge. And the challenge continues. Since the string crossings, stroke direction and the emphasis are all moving “out of phase” with one another, this exercise gives you the raw technique that you’ll need to play a wide variety of phrasings using optimal patterns of up-and-down strokes.

It seems complicated. And yet, once you grasp the pattern, it’s really easy to remember and play any time, during any warmup.

Example 4:

wpe4.jpg (47814 bytes) etc.

(continue pattern until exhausted)

Example 5 is a straightforward arpeggio exercise that uses both up and down strokes. Example 6 is a 4-string variation.

Example 5:

wpe5.jpg (23341 bytes)

run it up and down the fretboard, translate the shape to all other sets of 3 adjacent strings.


Example 6:

wpe7.jpg (29813 bytes)etc.

When you’ve mastered these exercises at swift speeds, you’ll have all the technique essentials to play blazing-fast swept licks.

Practice Tips: Pushing past your physical limits


Suppose you have a melodic phrase (or any other kind of passage) that you’re trying to learn that is giving you trouble. I’ve encountered plenty of these transcribing Django Reinhardt guitar parts with SlowGold. Figuring out what notes he’s playing is only half the battle for me – the man just plays so darn fast. So it’s a lot of work to actually get those phrases under my less-than-light-speed fingers. But I’m trying, and gradually succeeding. I feel the effort is worthwhile. Not only is my dexterity improving, but I’m getting a whole bunch of new shapes and habits into the “muscle memory” (more about this later) of my hands, which is where they have to be in order to be useful when I play on the gig or with other people.

Start Slow, Be Patient With Yourself, and Trust Your Body

You probably already know that the first step in learning a new passage is to play it along with a metronome set to a really slow speed (well, sometimes you have to stumble through the passage a few times before you can even do that – if even playing the passage at a really slow metronome setting is too difficult, see the section on Isolation below). You should hunt for the highest metronome setting at which you can play the passage comfortably, with good tone, and without errors several times in a row. Once you’ve found that setting, increase it a notch or two, until you have a setting which is just on the edge of your ability. You should be able to play the passage if you really concentrate and try.

Play the passage over and over again at this “edge of your ability” speed – for 5 to 15 minutes is what I usually do. If it’s physically painful in any way, stop immediately and pick it up again in a few hours or the next day. What usually happens for me is the opposite, however; the “edge speed” becomes comfortable fairly quickly, and I notch up the metronome further.

One note about metronome “notches” – if you’re playing a passage with one note per metronome beat, you may have to go several settings higher on the device before you notice much of a difference. On the other hand, if you’re playing 16th notes (4 per click), then a single metronome notch up might make a significant difference in difficulty.

You’ll probably notice that the very first time you try to play a passage with the metronome you may have to play it very slowly; yet, after the passage gets “into your hands” you’ll be able to make a big jump in speed. This phenomenon is known in some circles as muscle memory, and is indicative that your nerve pathways have actually been reprogrammed by your repetitive activity to take over some of the control from your conscious mental process. This is a good thing. A large part of the point of practice is, in my opinion, to reprogram the neural pathways.

This phenomenon will undoubtedly be evident the day after your first session with a new riff. You’ll set the metronome at a comfortable setting, and it will be significantly higher than the initial setting. You will be much more comfortable with the passage, to a degree that may surprise you.

Increasing your physical dexterity simply requires patience and repetition. You can’t force your pathways to learn any faster than they want to. Others may learn faster than you, but it’s not your fault, as long as you put in the time. Your body is your body, not their body, and there’s nothing you can do about that. Don’t try to play a passage much faster than your abilities dictate in an attempt to break over a hurdle – it’s just not gonna happen, and you’ll be wasting your time and increasing your frustration. And take breaks – 15 minutes is a really long time to work on a single passage and should be the absolute upper limit. Several short sessions each day are probably superior to one long one.

Above all, have faith. Follow this program and improvement is inevitable. It may not be at the pace you desire, but it will occur. Just keep at it.

Keep A Practice Log

I like to make note of the metronome settings and the date next to each passage I’m working on. This helps me track my progress. Click here for a free practice log template that you can print out and use.

Put Variety Into Your Practice Sessions

Don’t just practice one riff. It’s boring. Music is supposed to be fun, remember? In fact, don’t just practice riffs. Depending on the time you have available, try to increase your musical abilities in many areas. Set aside some time each day or week to write or create something. Learn new tunes. Study music theory and ear training books. Learn new riffs from records (using SlowGold, of course). Create new riffs based on ones you know. Everything you do to increase your physical and mental skills is valuable.

Don’t Be Afraid Of Backtracking

Some day you will notice that, although you’ve gradually goosed up the metronome to a pretty nice clip, what you’re playing is sounding sloppy or inadequate in some way. So bring the metronome back down and start re-practicing the passage with the higher standards that you’ve subconsciously developed in mind. It’s a good thing. Don’t try to rush your development. After all, when do you have to have this process done by? Never! (at least in most cases). It’s a Zen thing.

Observe Yourself

Listen carefully to what you’re playing. Is your tone good throughout? Where are the awkward points (this will bring us to Isolation, below)? Could you be fingering the passage in a more efficient manner? Are you sitting with proper posture? Are you holding tension that doesn’t need to be there in your hand? In your jaw? Any such tension detracts from your performance by sending bodily energy into unproductive and restrictive uses.

I have found that, with guitar parts, where I put my attention can make a huge difference – and in surprising ways. Some passages that I thought were tricky because of my right hand ended up being easier to play when I focussed on my left hand during practice, and vice versa! I still don’t understand it, except as an indication that sometimes my own beliefs as to what are the stumbling blocks may not be accurate. Weird.

Play With Your Eyes Closed

You may have to slow down the metronome considerably to do this, but it really is liberating not to have to look at your hands while you’re playing.

Isolation

In this troubled and fragmented world, you’d think that the last thing you’d want more of is isolation. But, in fact, isolation is a tremendously valuable tool for musicians trying to increase their physical skills.

I’ll be discussing two forms of isolation– the isolation and smoothing of trouble spots in difficult phrases (for all musicians) and left/right hand isolation for guitarists.

If you’re having difficulty with a phrase, try and identify the trouble spots. If they’re not obvious, just break the phrase in half and see which half is harder to play than the other. Keep breaking it up into smaller fragments and practicing them individually.

Once you’ve mastered a fragment of the phrase, the next step is to master the approach and exit from the fragment. Add a couple of notes before the fragment. Does it get harder? If so, practice the new, enlarged fragment for a while before adding more notes. You may have to slow down in order to incorporate the new part. Then add notes at the end. Continue this process until you’ve mastered the phrase.

Guitarists, and possibly other musicians, should also experiment with left/right hand isolation. My Django studies have forced me to develop a form of picking known as “sweep picking” in the right hand, in both ascending and descending patterns (left-handed guitarists: reverse everything I say in the next couple of paragraphs). I’m quite used to and facile with “alternating picking”, which is where the pick goes down for one note and up for the next. In contrast, in sweep picking, notes on adjacent strings are played with the same direction of pick motion.

This is a major shift for me. Normally, I’m fairly unconscious about my right hand, focussing attention instead on the left. But recently, I’ve found it very helpful to practice the right hand parts of the run only. I pick as though I’m playing the phrase, but I simply hold my left hand over the strings, damping them, instead of actually fretting the notes. After a few run-throughs in this manner, I usually have a much better handle on the piece.

Practice Everywhere

You do not have to be at your instrument in order to practice! Whenever you’re bored (but not while you’re driving a vehicle or operating heavy machinery – this is an intense exercise), visualize your fingers (and/or hands and feet) doing exactly what they would be doing if you were at your instrument. Start slowly and precisely, and then ramp up the speed – but never lose the precision of your vision! You’ll be amazed at how much of your physical difficulty may stem from an inadequate mental concept of the passage, and how much difference it can make in your playing.

It’s a Zen Thing

Don’t always be pushing the speed. In fact, it’s a good idea to settle in at a tempo just under your peak speed and play the passage over and over, concentrating on reaching a state of focused relaxation while the tone gets cleaner and cleaner. Do it for five minutes and let the tension seep out of your muscles.

In Conclusion

So, those are my practice tips for this issue of Woodsheddin’. If you have more of your own, e-mail them to wsirota@worldwidewoodshed.com and I’ll include them in a future issue, credited to you. Thanks for reading and playing!

Working Out Chords

Dave McKenna’s Rose Room